Showing posts with label rain garden. Show all posts

Tuesday, 12 November 2013

Rain Garden Plants

The Plants
One of the most exciting things about rain gardens is the opportunity they provide to plant native species in urban areas, thus helping to restore urban habitat for birds and pollinators like bumblebees and butterflies. We’ve pulled together a list of species that have been used in rain gardens in Nova Scotia and Maine here.

Plant Common Name
Plant Latin Name
Dwarf Goat's Beard
Aruncus aethusifolius
Woods Purple New York Aster
Aster novi-belgii
Blue Flag Iris
Iris veriscolor
Switch Grass
Panicum Virgatum
Hard Sheild Fern
Polystichum aculeatum
Goldsturm Black-Eyed Susan
Rudbeckia fulgida "Goldsturm"
Red twig Dogwood
Cornus sericea
Sweet Flag
Acorus americanus
Swamp Milkweed
Asclepius incarnata
Marsh Marigold
Caltha palustris
White Turtle Head
Chelone glabra
Christmas Fern
Polystichum acrostichoides
New England Aster
Symphyotrichum novae-angliae
Vernal Witch Hazel
Hamamelis vernalis
Native Rhododendron
Rhododendron canadense
Labrador tea
Ledum groenlandicum
Winterberry
Ilex verticillata
Royal fern
Osmunda regalis
Native Columbine
Aquilegia canadensis
Sensitive Fern
Onoclea sensibilis
Cardinal Flower
Lobelia cardinalis
Sweet Fern
Comptonia peregrina
Bearberry
Arctostaplylos uva-ursi
Wild geranium
Geranium maculatum
Northern Maidenhair Fern
Adiantum pedatum
Joe Pye Weed
Eupatorium maculatum
Serviceberry
Amelanchier canadensis
Bayberry
Myrica pensylvanica
Blood root
Sanguinaria canadensis
Wild raisin
Viburnum nudum

When selecting plants, consider its growing preferences and features:
·         Native or non-native?
·         Sun or shade
·         Acidic or alkaline soils
·         Nitrogen fixer?
·         Full-size shape & size
·         Moisture tolerance
·         Edible/medicinal?
·         Wildlife benefits?

The Dalhousie rain garden features:
Sweetfern (Comptonia peregrina)
Serviceberry (Amelanchier canadensis)
Bayberry (Myrica pensylvanica)
Blue Flag Iris (Iris versicolor)
Joe Pye Weed (Eupatorium maculatum)
Black Eyed Susan (Rudbeckia fulgida)
Foam Flower (Tiarella cordifolia)
Christmas Fern (Polystichum acrostichoides)
Ostrich Fern (Matteuccia struthiopteris)
Sensitive Fern (Onoclea sensibilis)

The Evergreen Native Plant Database is a great tool for learning about and choosing native plants. If you really want to be sure a plant is native to Nova Scotia and learn about its natural habitat, consult Roland’s tome, The Flora of Nova Scotia, available online here: Part 1 and Part 2.

It can be a challenge to find sources of native plants, and even as the garden was being planned, some nurseries were closing. Here’s a list of nurseries in Nova Scotia that supply native plants suitable for rain gardens.

Baldwin Nurseries Falmouth, NS 798-9468 www.baldwinnurseries.com
Blomidon Nurseries Wolfville, NS 542-2295 www.blomidonnurseries.net/home
Bunchberry Nurseries Upper Clements, NS 532-7777 www.bunchberrynurseries.ca/
Oceanview Garden and Landscaping Chester, NS 275-2505 www.plantcrazy.ca

Ouestville Perennials West Pubnico, NS 762-3198 www.ouestvilleperennials.com

Wednesday, 16 October 2013

Dalhousie Rain Garden is Complete!


There’s a new rain garden in town! With funding from TD Friends of the Environment, the Coastal and Water Team at the EAC was able to partner with Dalhousie’s Office of Sustainability to build a rain garden on the Dalhousie Campus.  Our site is a challenging one, in that it receives high flows of stormwater during heavy rains, enough to cause basement flooding of several buildings down the hill toward the Northwest Arm. The garden is located at the intersection of Coburg Rd and Oxford Rd, at the School of Social Work ‘house-turned-office’.  While our goal was initially to build a rain garden that demonstrates that this is an accessible DIY project for homeowners, this site and the design it required moved the project out of the DIY category!  However, there are many aspects of the design and build process that still apply to a homeowner excited about a rain garden sized for capturing rainwater from a roof via a downspout or two.

Our Process & Design
First, we assessed the site, which means that we looked at a variety of factors that will influence how water moves over the site. This includes soil type and drainage properties, slope, and the size of the rain catchment area. Check out previous rain garden how-to posts here for details on these steps.

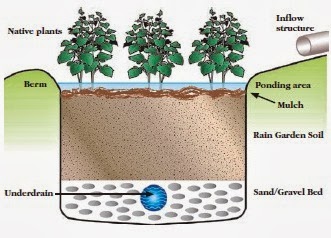
Our calculations showed that we needed a very large garden to absorb all the stormwater which we calculated flowed onto the site. In fact, the calculated area was larger than the area we had available! In addition, we found the slope of the site to be steeper than the suggested 12% for rain gardens in even the flattest area. This meant that we had to increase the capacity of the garden not by surface area, but by depth. The garden is 24 inches deep, whereas most rain gardens are 6-8 inches deep. To increase the porous volume in the garden, we filled the depression to a depth of 14 inches of clear stone, which would hold water in the bottom of the garden, while also holding soil on top. The cross-sectional design looked much like this diagram, from the Fairfax County Virginia website (Figure 1).
Figure 1. Approximate cross-sectional view of the rain garden at Dalhousie.

We used drainage tile (underdrain in the diagram) to move the stormwater that flows from the road and sidewalk over the steep hillside into the rain garden. See the photo below (Figure 2).


Figure 2. In the middle of this photo, the drainage tile is sticking out of the clear stone in the middle of the garden. The tile extends back to where the volunteers are sitting on the slope to catch water flowing down the slope and direct it into the rain garden.

In this photo (Figure 2) you can see how deep the garden is and just how much clear stone is at the bottom. And another key design feature is starting to form: the berm! The berm is essential in a garden of this size, on this slope, and so close to the house. The berm will help retain the water in the garden while it pools and infiltrates. Below (Figure 3) you can see how the berm has been planted with larger native shrubs such as sweet fern and bayberry, as well as a serviceberry tree. As these plants establish, they will help anchor the berm in place. To increase the strength of the berm, it was constructed out of sod mats from the beginning of excavation. Each layer was tamped down, and then new sod was staked into the backside of the berm all the way around the edge of the garden.

Figure 3. The depth of the garden, the volume of clear stone and the berm are all clear in this photo.

Another unique feature of the garden can be seen from the photo (Figure 4) of the completed garden below: the centre of the garden is actually filled with clear stone and then beach stone all the way to the surface. The goal of this design is to allow water which rushes down the slope from Coburg Rd to first hit the beach stone, which will slow down the flow. Then it will make its way to this holding pond in the centre, and as that space fills, the water will first infiltrate horizontally into the soil and plant roots, and then only when it is really full will the water flow over the surface of the mulch and soil, up to the height of the berm. The water will be slowed to the point where it can infiltrate into the groundwater.


Figure 4. The back portion of the completed garden contains stone all the way to the surface, with native shrubs planted in the berm.

Stay tuned to the blog over the coming weeks to learn more about the plants we used and how we chose them, as well as thoughts about rain gardens functioning as marine protective areas, coastal erosion prevention tools, and social activities.

Monday, 22 July 2013

Dig It: Digging tips for your Rain Garden

Before Digging
            There are a couple steps you should keep in mind before you start. If you have currently have grass in that area, it would be easier to kill it first. You can either break it apart manually, or cover the space until the grass dies. The other important thing to consider is whether there are utilities running through that sector of the yard. It is much easier to call the municipality and check that there are no lines running through your property than pay for damages. 
To construct the garden, you will need the following: a tape measurer, shovels, rakes, trowels, carpenter’s level, wooden stakes at least 2 feet long, string, river stones. You will also need topsoil, mulch, and possibly grasses for the berm. From there you can add ornaments, decorative stones, or whatever you wish to improve your garden’s aesthetics. Residential gardens typically cost 3-5$ per square foot to install if you are not paying for labour. The plants chosen to occupy the garden are the most expensive portion.
 The Digging Process
 Outline the perimeter of your rain garden with string.  Now put stakes along the uphill and the downhill side of your garden approximately 1.5 meters apart (5 feet). Now tie a piece of string to the stake pairs and make sure that it is level, that way you can get a consistent depth measurement for the rain garden.
            Start to dig at the uphill stake until you reach the targeted depth you calculated before. Then move down the slope to the downhill side, digging and filling to reach the targeted depth. If you do the one section at a time, it is easier to use the displaced soil to level out the lower end of the garden and start outlining the berm with the surplus. Try to keep the base of the garden as level as possible.
            If you want to line the base with compost, add one or two inches to your target depth. Once you have the garden base dug, mix the compost with the soil at the bottom. If you want to add sand pockets to help filtration, do so now.
            Depending on the distance from your downspout to the garden, you may need to dig a shallow funnel to direct the flow. The side where the water enters the garden is the inlet. Inlets are susceptible to erosion because of the fast-moving water, so you should add larger, rough-edged river rocks to break the flow.
The Berm
            Heap soil around the garden, leaving the entryway bare and ensuring that the highest wall is at the downhill edge of the garden. Make the berm about 0.3 m (1 foot) across and stomp on it hard to make it compact. The berm should have very gently sloping sides to slow erosion and allow water to soak into the ground. To help the water to soak in, you can cover the slopes with mulch, grasses, or dry-tolerant plant species. If you expect to collect large volumes of water at a time, you can include a notch (a low point) in the berm that will allow water to pass during heavy rain events. Line the notch in landscape fabric and add river stones to slow the exit of the water. Angle the outlet away from structures and towards vegetation if possible.

Monday, 24 June 2013

How big should your rain garden be?

Rain gardens typically range from 30-90 square meters (100 to 300 square feet). They can be smaller or larger depending on your resources. Even if you reduce the recommended size of your rain garden by 30%, you will still control 90% of the runoff.

If your rain garden site is within 9 meters (30 feet) of a downspout, most of the storm water will come from the roof so you will only need to calculate its area to obtain the capacity. The area of the roof is the same as the area of the first floor. If you do not know it, use a tape measurer to find the length and width of your house. The product of the two is your area. Now take a walk around your house, how many downspouts do you have? Most houses have 4, each taking care of 25% of the roof runoff. By the shape of the roof, estimate the percent of water your downspout is responsible for. Now multiply the percent of water flowing down the downspout by the roof area. That is your roof drainage area.

Example: You have a building that is 5 m long and 5 m wide and has 2 downspouts that share the load equally. The ground floor area is: 5 m x 5 m = 25 m2. If your 2 downspouts are equal, one will take care of 50% of the water. Your drainage area will then be: 25 m2 x 0.5 =12.5 m2

If the site is over 9 meters away from a downspout you will need to consider drainage from the lawn. From your rain garden site, look up towards the house and identify which parts of the lawn slope towards your garden. You will need to measure the length and width of the uphill lawn and multiply them to get the lawn area. Now you simply need to add that lawn area to the roof drainage area (calculated in the previous step).

Example: Your building is surrounded by a lawn that slopes towards your garden. It measures 2 m long and 3 m wide. 2 m x 3 m =6 m2 as your lawn area. Your total drainage area will then be: 12.5 m2 + 6 m2 = 18.5 m2.

Now you need use your slope, drainage area, and suggested depth to get the surface area of your garden. Use the table below to determine your size factor, then multiply it by your calculated drainage area.


Location
Depth
Sandy
Silty
Clay
Within 9.1 m


8-13 cm
0.19
0.34
0.43

15-18 cm
0.15
0.25
0.32

20 cm
0.08
0.16
0.20
Beyond 9.1 m
All Depths
0.03
0.06
0.10


Example: You have a drainage area of 18.5 m2  sandy soil, and a depth of 8-13 cm. The surface area of your rain garden should then be: 18.5 m2 x 0.19 = 3.5 m2.

Once you calculate the size of your rain garden, you can divide it by the intended width to find its length. You will want the garden to be twice as long as it is wide, with a max width of 15 feet especially for slopes greater than 8%.


Wednesday, 19 June 2013

Slecting the Best Site for the Rain Garden: Slope and Soil

Before you get started on building your rain garden, you want to know the answer to two basic questions: "What's my slope?" and "What kind of soil do I have?".  This article will help you get to the bottom of these two questions.

What’s My Slope?


 To calculate the slope of the intended rain garden, pound one stake uphill of the site and the other at the downhill end approximately 5 m (15 feet) apart. Tie the string to the stakes and make sure it is horizontal with a carpenter’s levels. Once the string is properly secured and level, measure the length of the string between the two stakes and then the height of the string from the ground at the downhill stake.   The percent slope will be equal to:


Percent Slope = Height x 100
                         Length

Slope <4%, easiest to build 8-13 cm (3-5 inch) deep rain garden.
Slope 5-7%, try to build it 15-18 cm (6-7 inches) deep.
Slope 8-12%, build it 20 cm (8 inches) deep.
If the slope is greater than 12%, it would be easier to install a garden elsewhere.

How Do I Know What Kind of Soil I have?


Before you even think of putting a shovel in the ground, you also need to figure out what type of soil your rain garden site has. Sandy soils have the fastest infiltration; clay the slowest. Sandy soils are described as gritty and coarse, silty as smooth but not sticky, and Clay as sticky and clumpy. Clay garden must be bigger to handle infiltration and should have sandy pits installed in them to help infiltration. Here is an easy test to help you see if your rain garden will work well at your selected spot:

Soil test: Dig a hole 15 cm (6 inches) deep and fill with water and allow it to filter away. If it takes more than 24 hours to drain, the soil is more clay-based and is not good for a rain garden. You can mitigate the lack of drainage by adding sandy soil pockets during installation, but that takes time and money.

Monday, 10 June 2013

Planning the Rain Garden

The first thing you need to know is where the water goes. Where do the downspouts from your gutters point? Do you see small rivulets of water passing through the grass? Do they join the stream from the downspouts? Does the water pool anywhere? Where can you catch the most water?

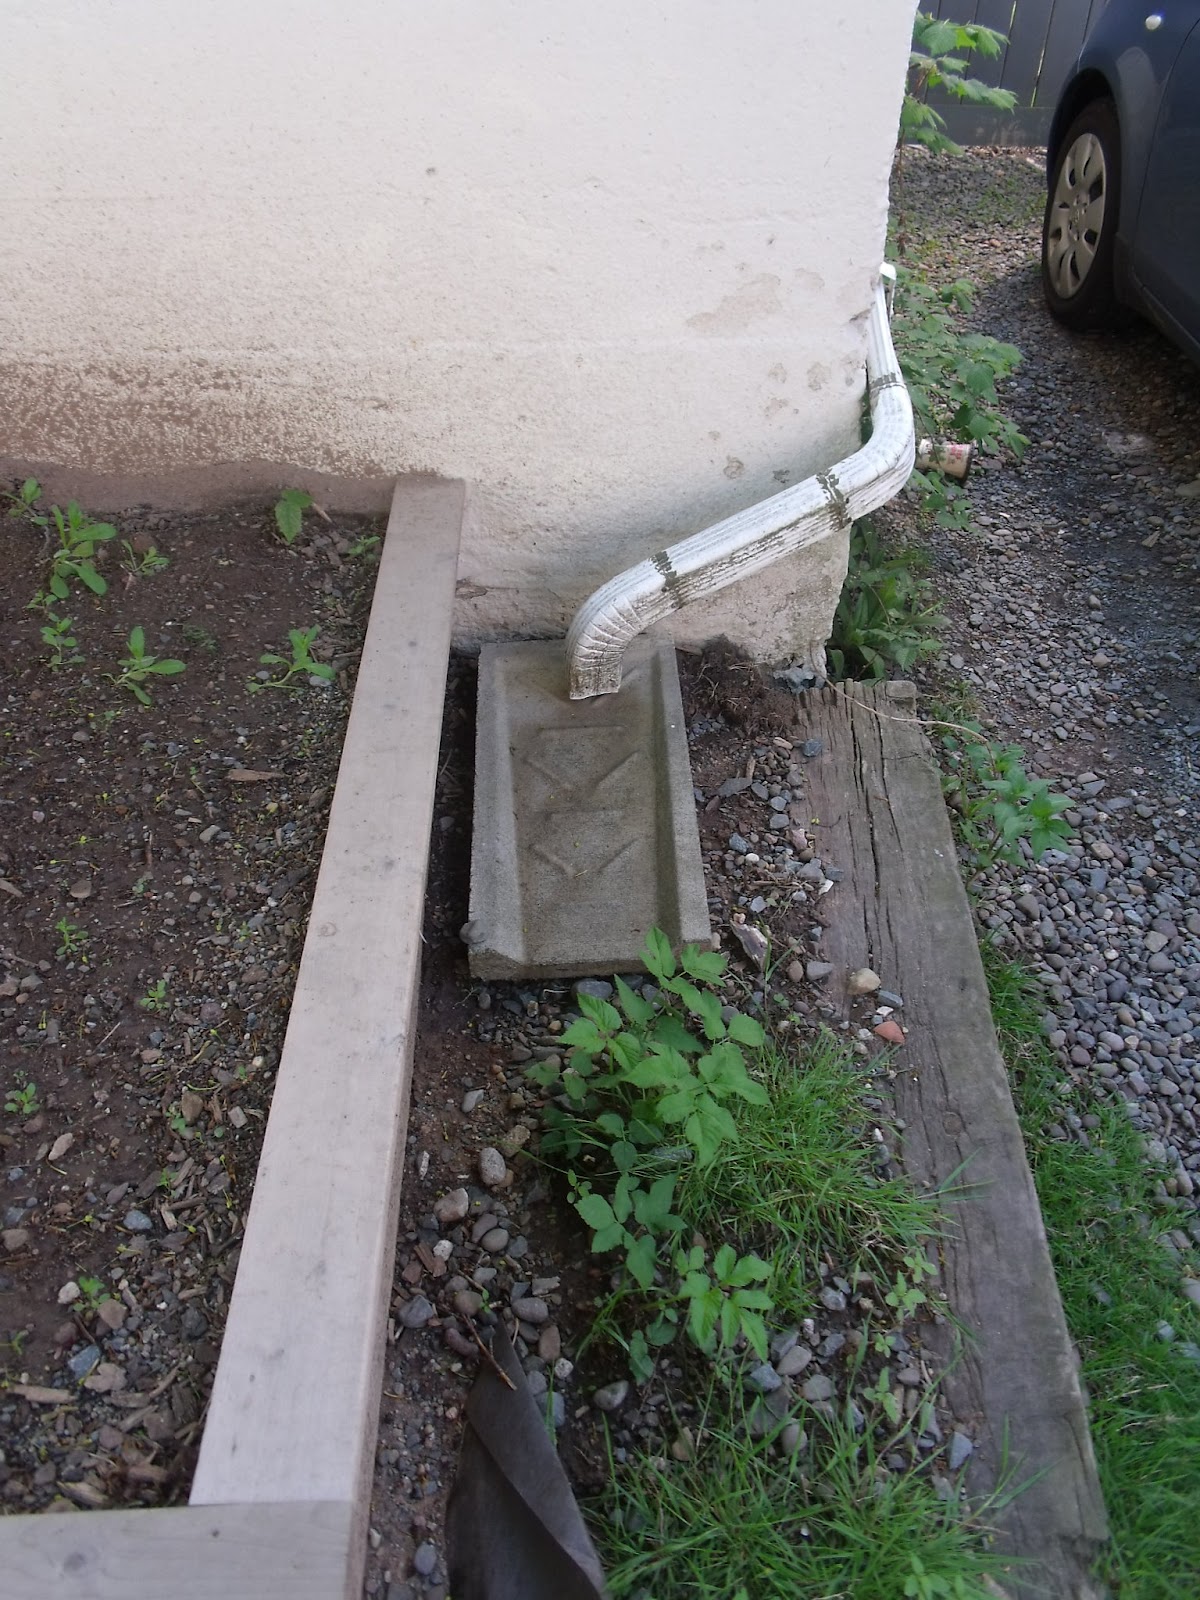
This downspout allows stormwater to flow away from the property.

Once you have an idea of where the water flows, you can start eliminating areas around your house. Do not install a rain garden where the water naturally pools, that is where filtration is slowest; think about installing it where the rain garden can catch the water before it pools. You also want to avoid large tree roots. If there are branches overhead, there are roots beneath your feet.

Try to put the rain garden close to a downspout but it is important that you keep the rain garden at least 3 meters (or 10  feet) away from the building to protect the foundation of your house. It is also important to keep your rain garden at least 7.6 meters (or 25 feet) away from your septic system.

After that, it is more a matter of practicality. Installing a rain garden in a flatter portion of land will be easier to dig and level. Make it easier for yourself and do not decide to dig a rain garden where the slope is more than 12%, you will need retaining wall or a high berm to keep the water in and it will take a lot of earth to level out the garden.

In terms of design, crescent-, kidney-, or teardrop-shaped gardens work well. You will want the longer side of the garden to face upslope. Water will hit the berm at the back of that long line, and then flow back towards the garden like a receding wave at the beach. A larger surface will catch the most water possible.


Consider the height, bloom times, colours, and textures of the plants you are planning to use. By choosing plants that bloom at different times, your garden will have a longer flowering season. If you want a traditional, more formal look, try clumping individual species in groups of 3-6 plants and repeat the pattern throughout the garden. Try mixing sedges, rushes, and grasses with flowering species to keep the root network strong and keep some plants from overpowering each other. 

Thursday, 6 December 2012

Download our Stormwater Brochure

Want to plant the seed for alternative stormwater management with your friends, co-workers or members?  Download our colour brochure here and spread the word!


For a higher resolution version, please contact the Ecology Action Centre.


Sunday, 23 September 2012

Slow it, spread it, sink it

We wanted to share this great video by the US Environmental Protection Agency that shows a number of ways to reduce stormwater runoff including rain gardens, rain barrels and green roofs. Many of these best practices can be used at your home. The goal of these tools is to 'slow, spread and sink' the stormwater to keep it from polluting downstream waters.

Monday, 23 July 2012

Urban Water and your Property


The following blog post was written by Mike Price, former general manager of Toronto Water and highly valued Ecology Action Centre volunteer. This  post provides a comprehensive overview on the issues and solutions related to incoming water on a property. A subsequent post will look at outgoing water, or drainage. Thanks for the great blog contribution, Mike! 


Downspout deco-chain (Photo: M. Price)
The water used on a typical urban lot comes from two directions. Down from the sky or out of a water pipe. Rainfall can be good, and sometimes hazardous, but we don’t make the best use of it. The water from your tap (potable) can be from several sources:
        - Private untreated supply from a well on the property
        - Municipal treated supply, from the tap, originates from surface water (lake or river) or ground water from wells

·        Current Issues regarding municipal water supplies

      -  Surface waters, lakes and rivers, can become contaminated from human activities. 
      -  The volume of supply from surface water in Canada is dwindling due in part to ‘climate change’, but also due to increased demand. 
      -  Ground water supplies are similarly impacted but depending on the depth of the well the ability to replenish is being negatively impacted by human intervention.
      -   A large amount of energy is used to treat and pump the municipal water to reservoirs and around the water distribution system. 
      -  During hot summer months up to 50% of the water supplied is used for external ground watering.
       - Throughout the year about 60% of the building water use is for flushing toilets

Recreational beach closure (Photo: M.Price)

. Current solutions for urban water providers and users


    Water providers (Province, Municipalities and/or water utilities)

  -   Prepare and implement Source Water Protection Plans
  -   Prepare and promote Water Efficiency Plans
  -   Actively seek out and repair water pipe leaks
  -   Eliminate unnecessary fire hydrant flushing
  -   Minimize energy used in the treatment and distribution of potable water
  -   Prepare and regulate Pollution Prevention Plans
  -   Prepare and implement Storm Water Management Plans
   -  Mitigate the impacts of Combined Sewer Overflows

   Water users (residential and ICI property owners)

 -  Minimize tap water use
     a)   Low flush toilets
     b)   Reduced volume shower and tap heads
     c)   Grey water re-use (for toilet flushing)
    d)   Use more drought resistant garden plants (called Xeriscaping)
    e)   Eco-gardening
     f)   Use timers on automatic sprinklers

 - Maximize rain water use
     a)   Rainwater harvesting
               1.   Downspout disconnection
               2.   Grade property to keep rainwater from running off the property
               3.   Use rain barrels for garden watering
               4.   Create specific areas for a rain garden
               5.   Minimize paved areas
Rain barrel installed at disconnected downspout  (Photo: M. Price)

Friday, 25 May 2012

Drainage and your property

Proper drainage around your home will help reduce risk of basement flooding, reduce problems with your basement foundation (cracking, shifting), extend the life of your sump pump and reduce the volume of water that flows into the sewer system. The Canada Mortgage and Housing Corporation (CMHC) recommends 3 principles to improve water management on your property.


 1. Drain water away from your house and avoid causing drainage problems on neighbouring properties. 

  • Build up the ground around your house so that water flows away from your basement walls. CMHC recommends at least a 5% slope away from your foundation walls and a 2% slope for impermeable surfaces next to your house (driveway/patio).
  • Disconnect your downspouts if they are directly connected to your home's sewer system. Place an extension on your downspouts to direct roof runoff at least 4 m away from your house so that water doesn't pool next to your basement. The extension can direct water toward a rain garden or backyard where it can soak into the ground without causing problems. Use a splash pad, pebbles or crushed rock to absorb the impact of water and prevent soil erosion. 
  • A French drain or bioswale can also be used to convey water away from your home. If you have a waterfront property and your runoff is being conveyed directly into a water body, try to add some curves or pooling areas to your conveyance system to slow down the water and allow sediment and other pollutants to settle out. 


Remember to disconnect your downspouts!


Extend your downspout so water drains away from  your house
Use a splash pad to prevent erosion
     2. Let runoff soak into the ground on your property
       

  •      Limit the amount of paved or other hard surfaces. Use permeable pavers, paved driveway strips or gravel for increased driveway permeability.
  •      Direct water toward a rain garden, which should be at least 4 m from your house. Rain gardens work great for everyday rain events, however it is important to consider designing an overflow system (swale or perforated pipe) to help convey excess water toward the street during a heavy rainfall event. 
  •      Soil aeration can reduce compaction and allow better infiltration. Water pooling on your property for an extended period is a good indication that your soil may need aeration.
 

If possible, reduce large paved areas
Modular paving stones, or permeable pavers, allow water to infiltrate into the ground
    3. Capture and reuse water

  •      Place a rain barrel under your disconnected downspouts to capture rooftop runoff. Elevate the barrel above ground level so that a tap or hose can be installed for easy water collection.


Raised rainbarrel system. Photo: The Transplanted Gardener
      Visit  the Canada Mortgage and Housing Corporation website for more practical information on how to improve drainage on your property to avoid basement flooding.

Friday, 18 May 2012

12,000 rain gardens

The Puget Sound region of Washington State is tackling water quality issues with a new campaign to install 12,000 rain gardens by 2016. Once completed, these rain gardens will soak up 160 million gallons of polluted stormwater runoff each year. This innovative campaign offers financial incentives and comprehensive educational materials to neighbourhoods as a way to encourage individuals to do their own part to reduce the amount of pollutants entering the environment while solving drainage problems around their own homes. By encouraging individuals to become neighbourhood champions and recruit others, entire neighbourhoods are coming together to learn about and install rain gardens.The campaign currently has 706 raingardens installed.

Check out the website to find some great resource materials and learn more about the program.

Wednesday, 15 February 2012

Rain Gardens

Rain garden constructed by Clean Annapolis River Project (www.annapolisriver.ca)
Rain gardens are small, landscaped areas that capture, filter and infiltrate rainwater.  Rain gardens can create an attractive detention area where runoff can slowly soak into the ground, be taken up by plants and return to the atmosphere through evapotranspiration. Planted with water-tolerant native plants, rain gardens can become a beautiful and functional feature on your property.

Rain gardens allow at least 30% more water to infiltrate into the ground, compared to a conventional lawn (source). They can help recharge groundwater resources, reduce stormwater volumes and create habitat. Rain gardens are relatively easy and inexpensive to design and build. Just keep in mind a few important considerations when deciding where and how to install a rain garden on your property:

-Observe how stormwater naturally runs in your yard. Place the rain garden at a low point or elsewhere along the natural flow path.

- Maintain at least a 1% slope from the impervious surface to the garden. 

- Rain gardens should be located approximately 3 m away from a building to avoid drainage problems on your property.

-Clay soils don’t allow for proper drainage, therefore look for a place with soil that is sandy, gravelly, loam or a mix. If your soil has a high clay percentage, you can add sand, fine gravel and/or organic matter to improve permeability.

- The surface area of a rain garden should be 20-30% of the roof/parking lot area it drains.

- A general guideline for rain garden depth is 7.5 cm in soils with relatively low infiltration rates (i.e., loam) and up to 15 cm in soils with high infiltration rates (i.e., sandy or gravelly soils).

-  A downspout can empty directly into a rain garden. Just add some stones or a splash pad to prevent erosion.

Rain garden (Photo CMCH: bit.ly/dCOkur)

Some really helpful tips on installing and maintaining rain gardens can be found from the Canadian Mortgage and Housing Corporation's factsheet 'Improving Stormwater Management in Your Yard'.  
More great information on rain gardens, including a list of native, water-loving plants, can be on the Clean Annapolis River Project website

Do you have a photo of a rain garden or maintenance tips that you'd like to share? We'd love to see them! 

Beautiful! (Photo: www.atlantic.sierraclub.ca)