Showing posts with label bioretention. Show all posts

Monday, 22 July 2013

Dig It: Digging tips for your Rain Garden

Before Digging
            There are a couple steps you should keep in mind before you start. If you have currently have grass in that area, it would be easier to kill it first. You can either break it apart manually, or cover the space until the grass dies. The other important thing to consider is whether there are utilities running through that sector of the yard. It is much easier to call the municipality and check that there are no lines running through your property than pay for damages. 
To construct the garden, you will need the following: a tape measurer, shovels, rakes, trowels, carpenter’s level, wooden stakes at least 2 feet long, string, river stones. You will also need topsoil, mulch, and possibly grasses for the berm. From there you can add ornaments, decorative stones, or whatever you wish to improve your garden’s aesthetics. Residential gardens typically cost 3-5$ per square foot to install if you are not paying for labour. The plants chosen to occupy the garden are the most expensive portion.
 The Digging Process
 Outline the perimeter of your rain garden with string.  Now put stakes along the uphill and the downhill side of your garden approximately 1.5 meters apart (5 feet). Now tie a piece of string to the stake pairs and make sure that it is level, that way you can get a consistent depth measurement for the rain garden.
            Start to dig at the uphill stake until you reach the targeted depth you calculated before. Then move down the slope to the downhill side, digging and filling to reach the targeted depth. If you do the one section at a time, it is easier to use the displaced soil to level out the lower end of the garden and start outlining the berm with the surplus. Try to keep the base of the garden as level as possible.
            If you want to line the base with compost, add one or two inches to your target depth. Once you have the garden base dug, mix the compost with the soil at the bottom. If you want to add sand pockets to help filtration, do so now.
            Depending on the distance from your downspout to the garden, you may need to dig a shallow funnel to direct the flow. The side where the water enters the garden is the inlet. Inlets are susceptible to erosion because of the fast-moving water, so you should add larger, rough-edged river rocks to break the flow.
The Berm
            Heap soil around the garden, leaving the entryway bare and ensuring that the highest wall is at the downhill edge of the garden. Make the berm about 0.3 m (1 foot) across and stomp on it hard to make it compact. The berm should have very gently sloping sides to slow erosion and allow water to soak into the ground. To help the water to soak in, you can cover the slopes with mulch, grasses, or dry-tolerant plant species. If you expect to collect large volumes of water at a time, you can include a notch (a low point) in the berm that will allow water to pass during heavy rain events. Line the notch in landscape fabric and add river stones to slow the exit of the water. Angle the outlet away from structures and towards vegetation if possible.

Monday, 24 June 2013

How big should your rain garden be?

Rain gardens typically range from 30-90 square meters (100 to 300 square feet). They can be smaller or larger depending on your resources. Even if you reduce the recommended size of your rain garden by 30%, you will still control 90% of the runoff.

If your rain garden site is within 9 meters (30 feet) of a downspout, most of the storm water will come from the roof so you will only need to calculate its area to obtain the capacity. The area of the roof is the same as the area of the first floor. If you do not know it, use a tape measurer to find the length and width of your house. The product of the two is your area. Now take a walk around your house, how many downspouts do you have? Most houses have 4, each taking care of 25% of the roof runoff. By the shape of the roof, estimate the percent of water your downspout is responsible for. Now multiply the percent of water flowing down the downspout by the roof area. That is your roof drainage area.

Example: You have a building that is 5 m long and 5 m wide and has 2 downspouts that share the load equally. The ground floor area is: 5 m x 5 m = 25 m2. If your 2 downspouts are equal, one will take care of 50% of the water. Your drainage area will then be: 25 m2 x 0.5 =12.5 m2

If the site is over 9 meters away from a downspout you will need to consider drainage from the lawn. From your rain garden site, look up towards the house and identify which parts of the lawn slope towards your garden. You will need to measure the length and width of the uphill lawn and multiply them to get the lawn area. Now you simply need to add that lawn area to the roof drainage area (calculated in the previous step).

Example: Your building is surrounded by a lawn that slopes towards your garden. It measures 2 m long and 3 m wide. 2 m x 3 m =6 m2 as your lawn area. Your total drainage area will then be: 12.5 m2 + 6 m2 = 18.5 m2.

Now you need use your slope, drainage area, and suggested depth to get the surface area of your garden. Use the table below to determine your size factor, then multiply it by your calculated drainage area.


Location
Depth
Sandy
Silty
Clay
Within 9.1 m


8-13 cm
0.19
0.34
0.43

15-18 cm
0.15
0.25
0.32

20 cm
0.08
0.16
0.20
Beyond 9.1 m
All Depths
0.03
0.06
0.10


Example: You have a drainage area of 18.5 m2  sandy soil, and a depth of 8-13 cm. The surface area of your rain garden should then be: 18.5 m2 x 0.19 = 3.5 m2.

Once you calculate the size of your rain garden, you can divide it by the intended width to find its length. You will want the garden to be twice as long as it is wide, with a max width of 15 feet especially for slopes greater than 8%.


Wednesday, 19 June 2013

Slecting the Best Site for the Rain Garden: Slope and Soil

Before you get started on building your rain garden, you want to know the answer to two basic questions: "What's my slope?" and "What kind of soil do I have?".  This article will help you get to the bottom of these two questions.

What’s My Slope?


 To calculate the slope of the intended rain garden, pound one stake uphill of the site and the other at the downhill end approximately 5 m (15 feet) apart. Tie the string to the stakes and make sure it is horizontal with a carpenter’s levels. Once the string is properly secured and level, measure the length of the string between the two stakes and then the height of the string from the ground at the downhill stake.   The percent slope will be equal to:


Percent Slope = Height x 100
                         Length

Slope <4%, easiest to build 8-13 cm (3-5 inch) deep rain garden.
Slope 5-7%, try to build it 15-18 cm (6-7 inches) deep.
Slope 8-12%, build it 20 cm (8 inches) deep.
If the slope is greater than 12%, it would be easier to install a garden elsewhere.

How Do I Know What Kind of Soil I have?


Before you even think of putting a shovel in the ground, you also need to figure out what type of soil your rain garden site has. Sandy soils have the fastest infiltration; clay the slowest. Sandy soils are described as gritty and coarse, silty as smooth but not sticky, and Clay as sticky and clumpy. Clay garden must be bigger to handle infiltration and should have sandy pits installed in them to help infiltration. Here is an easy test to help you see if your rain garden will work well at your selected spot:

Soil test: Dig a hole 15 cm (6 inches) deep and fill with water and allow it to filter away. If it takes more than 24 hours to drain, the soil is more clay-based and is not good for a rain garden. You can mitigate the lack of drainage by adding sandy soil pockets during installation, but that takes time and money.

Monday, 10 June 2013

Planning the Rain Garden

The first thing you need to know is where the water goes. Where do the downspouts from your gutters point? Do you see small rivulets of water passing through the grass? Do they join the stream from the downspouts? Does the water pool anywhere? Where can you catch the most water?

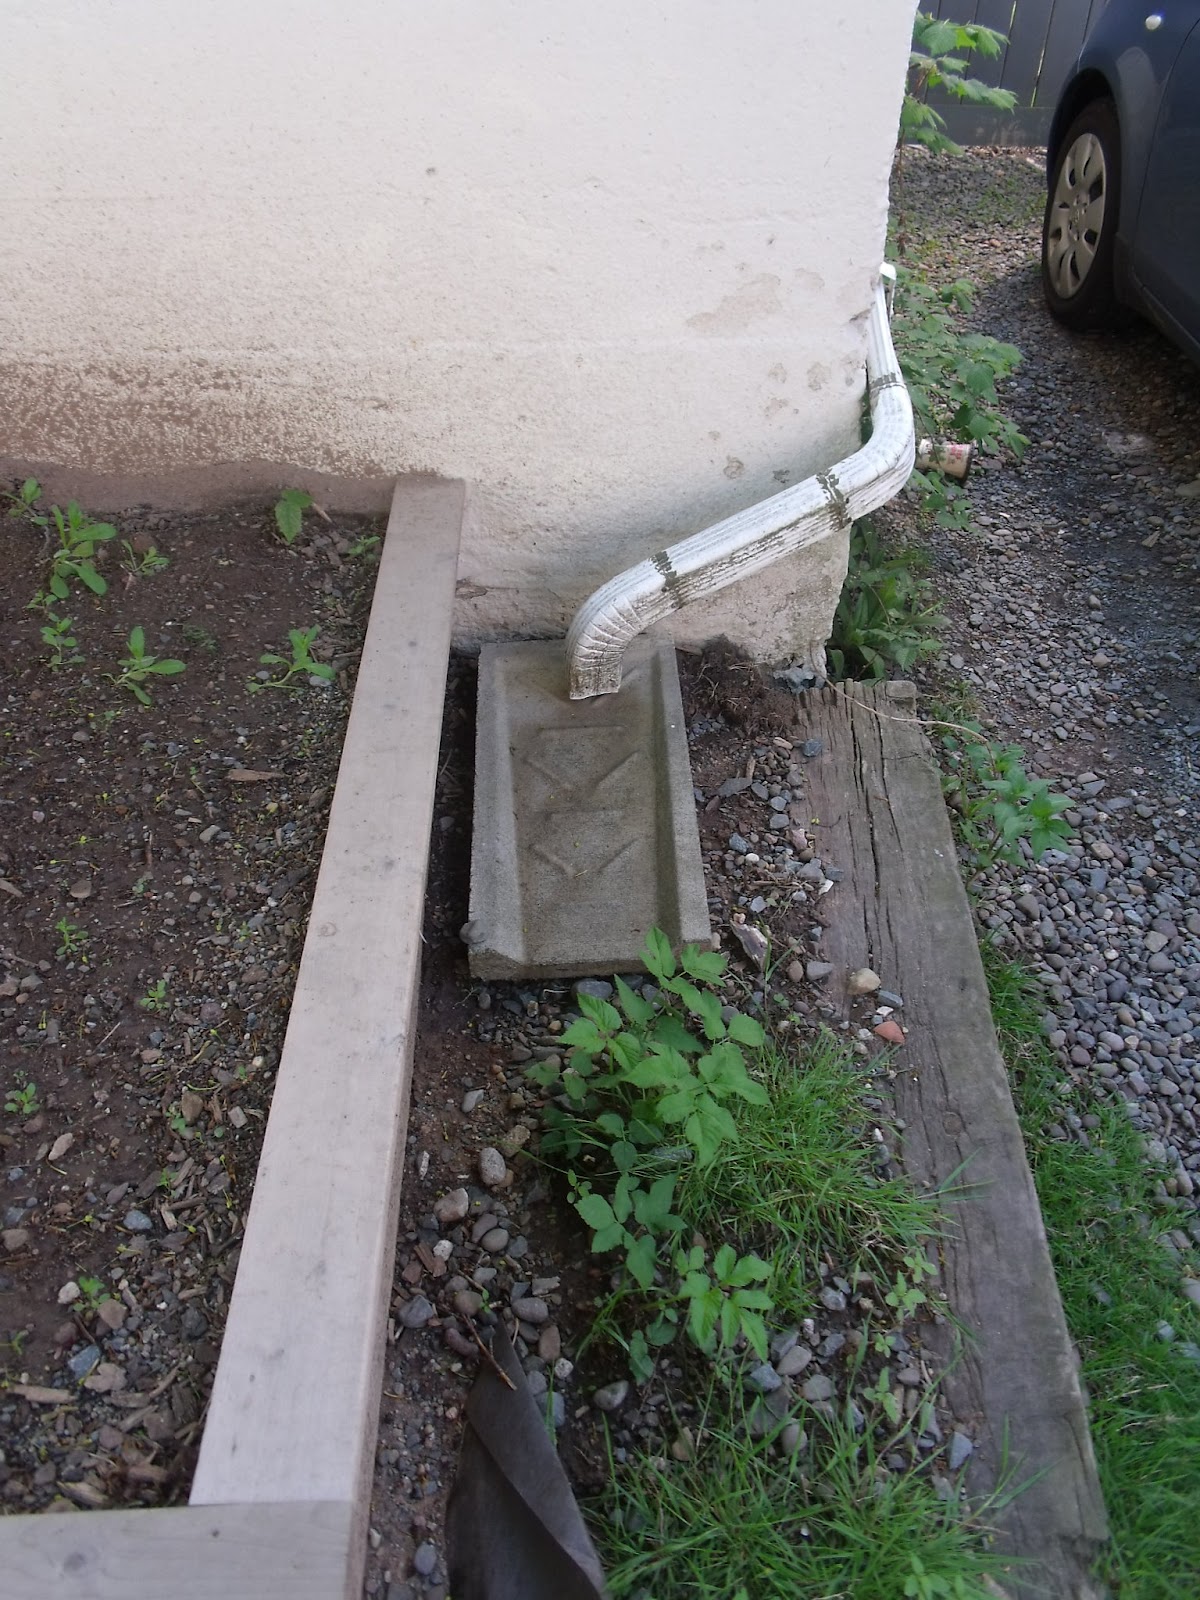
This downspout allows stormwater to flow away from the property.

Once you have an idea of where the water flows, you can start eliminating areas around your house. Do not install a rain garden where the water naturally pools, that is where filtration is slowest; think about installing it where the rain garden can catch the water before it pools. You also want to avoid large tree roots. If there are branches overhead, there are roots beneath your feet.

Try to put the rain garden close to a downspout but it is important that you keep the rain garden at least 3 meters (or 10  feet) away from the building to protect the foundation of your house. It is also important to keep your rain garden at least 7.6 meters (or 25 feet) away from your septic system.

After that, it is more a matter of practicality. Installing a rain garden in a flatter portion of land will be easier to dig and level. Make it easier for yourself and do not decide to dig a rain garden where the slope is more than 12%, you will need retaining wall or a high berm to keep the water in and it will take a lot of earth to level out the garden.

In terms of design, crescent-, kidney-, or teardrop-shaped gardens work well. You will want the longer side of the garden to face upslope. Water will hit the berm at the back of that long line, and then flow back towards the garden like a receding wave at the beach. A larger surface will catch the most water possible.


Consider the height, bloom times, colours, and textures of the plants you are planning to use. By choosing plants that bloom at different times, your garden will have a longer flowering season. If you want a traditional, more formal look, try clumping individual species in groups of 3-6 plants and repeat the pattern throughout the garden. Try mixing sedges, rushes, and grasses with flowering species to keep the root network strong and keep some plants from overpowering each other. 

Wednesday, 20 June 2012

Thermal pollution

When we think of how stormwater impacts lakes, rivers and streams, we tend to think of sediment and other contaminants that degrade water quality. We rarely think of how elevated runoff temperatures, known as thermal pollution, can greatly alter the temperature regime of natural water bodies. On hot days, impervious surfaces, such as parking lots and roofs, absorb and emit heat.  When it rains, heated runoff that flows over these surfaces can potentially increase the temperature of receiving waters. Increased temperatures can negatively impact coldwater fish populations by interfering with spawning and migration patterns, decreasing dissolved oxygen levels and even resulting in fish kills.

Stormwater Best Management Practices have an effect on runoff temperature, and the University of New Hampshire's Stormwater Centre has been researching the effectiveness of various BMPs in regulating thermal pollution from stormwater runoff.

They found that surface systems, such as retention ponds, that are exposed to direct sunlight provide little no reduction of high runoff temperatures and can potentially increase already elevated summer runoff temperatures. Various infiltration and filtration systems were best able to moderate runoff temperatures by thermal exchange with cooler subsurface materials. Systems with a large subsurface area had the greatest ability to buffer runoff temperatures. The full report titled 'Examination of Thermal Impacts from Stormwater Best Management Practices' can be found here

Brook Trout. (Photo: Source)

Friday, 25 May 2012

Drainage and your property

Proper drainage around your home will help reduce risk of basement flooding, reduce problems with your basement foundation (cracking, shifting), extend the life of your sump pump and reduce the volume of water that flows into the sewer system. The Canada Mortgage and Housing Corporation (CMHC) recommends 3 principles to improve water management on your property.


 1. Drain water away from your house and avoid causing drainage problems on neighbouring properties. 

  • Build up the ground around your house so that water flows away from your basement walls. CMHC recommends at least a 5% slope away from your foundation walls and a 2% slope for impermeable surfaces next to your house (driveway/patio).
  • Disconnect your downspouts if they are directly connected to your home's sewer system. Place an extension on your downspouts to direct roof runoff at least 4 m away from your house so that water doesn't pool next to your basement. The extension can direct water toward a rain garden or backyard where it can soak into the ground without causing problems. Use a splash pad, pebbles or crushed rock to absorb the impact of water and prevent soil erosion. 
  • A French drain or bioswale can also be used to convey water away from your home. If you have a waterfront property and your runoff is being conveyed directly into a water body, try to add some curves or pooling areas to your conveyance system to slow down the water and allow sediment and other pollutants to settle out. 


Remember to disconnect your downspouts!


Extend your downspout so water drains away from  your house
Use a splash pad to prevent erosion
     2. Let runoff soak into the ground on your property
       

  •      Limit the amount of paved or other hard surfaces. Use permeable pavers, paved driveway strips or gravel for increased driveway permeability.
  •      Direct water toward a rain garden, which should be at least 4 m from your house. Rain gardens work great for everyday rain events, however it is important to consider designing an overflow system (swale or perforated pipe) to help convey excess water toward the street during a heavy rainfall event. 
  •      Soil aeration can reduce compaction and allow better infiltration. Water pooling on your property for an extended period is a good indication that your soil may need aeration.
 

If possible, reduce large paved areas
Modular paving stones, or permeable pavers, allow water to infiltrate into the ground
    3. Capture and reuse water

  •      Place a rain barrel under your disconnected downspouts to capture rooftop runoff. Elevate the barrel above ground level so that a tap or hose can be installed for easy water collection.


Raised rainbarrel system. Photo: The Transplanted Gardener
      Visit  the Canada Mortgage and Housing Corporation website for more practical information on how to improve drainage on your property to avoid basement flooding.

Friday, 18 May 2012

12,000 rain gardens

The Puget Sound region of Washington State is tackling water quality issues with a new campaign to install 12,000 rain gardens by 2016. Once completed, these rain gardens will soak up 160 million gallons of polluted stormwater runoff each year. This innovative campaign offers financial incentives and comprehensive educational materials to neighbourhoods as a way to encourage individuals to do their own part to reduce the amount of pollutants entering the environment while solving drainage problems around their own homes. By encouraging individuals to become neighbourhood champions and recruit others, entire neighbourhoods are coming together to learn about and install rain gardens.The campaign currently has 706 raingardens installed.

Check out the website to find some great resource materials and learn more about the program.

Monday, 28 November 2011

Bioretention and Rainwater Harvesting

Improving stormwater in urban and rural areas helps to protect the health of rivers, streams and lakes.  Improvements made to an existing building or parking lot are known as a retrofit.  The Ecology Action Centre is currently considering sites within the city of Halifax for a potential stormwater retrofit project.  Learning from retrofit projects in other cities is helpful for developping options for a site in Halifax.


The short video below demonstrates two types of retrofits: a bioretention pond that captures and treats runoff from a large parking lot and rainwater harvested off a roof that is used for irrigating a sportsfield.