Friday 19 September 2014

Rain Gardens: Experiments with Planter Boxes

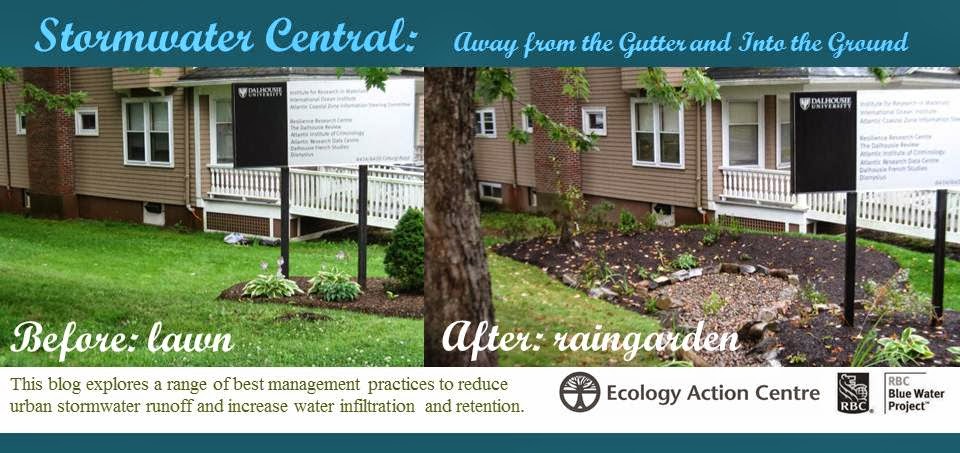
In Halifax’s North End, a grassy patch is a rare thing, at least along the street. And anyone in the area could tell you how much murky rainwater pools everywhere during a hard rain. A low-impact development enthusiast might say “Sounds like we need more rain gardens!” But the problem here is that rain gardens cannot be placed near building foundations because of the way they pull water down into the ground. This might lead to more basement flooding. So where, in this dense urban landscape of paved surfaces, can we put the water?

A typical North End garden and downspout.

One intriguing option is the stormwater planter box. It’s essentially a rain barrel filled with gravel, sandy soil and plants, which collects and holds water, filters it, and then slowly releases it at a different time than the rest of the rain. Cities all over the world are using them in dense urban areas as a low-impact development tool. These cities include: Melbourne, Australia; Portland, Oregon; Lancaster, Pennsylvania; Philadelphia, Pennsylvania; and Los Angeles, California. Why not here in Halifax?
 
A stormwater planter box in Philadelphia.
One thing you’ll notice is that nearly all the cities mentioned get minimal snow and ice (with the exception of Pennsylvania). So a key question for these stormwater planter boxes is how they perform in and recover from the winter. If they emerge from winter still functioning, then we have found a valuable answer to this tricky question of where to put rain water in a dense urban environment.

The Ecology Action Centre Coastal and Water Team has had an opportunity to build one test stormwater planter box in the Bloomfield area of the North End with generous funds from our local RBC branch on Almon St. If you want to replicate the experiment in your own space, here are the steps to take.

Step one: Choose an appropriate location. Select an area where you can easily disconnect a downspout and re-direct it into the stormwater planter box. This will look like a relatively flat empty space at most 2 meters square right next to your house. The two photos above are good examples of excellent spaces to use.

Step two: Find or build an appropriate container. You will need a container that can be water-proofed, and can have drainage holes cut into it, or can be fitted with a drain pipe. Ideal and easiest is an old water tub like the one below, because it is already assembled and water-proof. A polyurethane wheelbarrow would also work great, if you don’t mind the aesthetic of it.
If you like a wooden look, you can try to find one already assembled, like this one. You will need to water-proof it (read below for your options on how to do that) and cut a hole for the drain pipe.


If you cannot find an appropriate container, then you can build your own.
When selecting a container, think about the volume of water it will receive. You should calculate the drainage area from the part of the roof that drains into the downspout you will disconnect and send into the planter box.

This table of sizing guidelines is from Melbourne Water.
Drainage Area m2
Planter Box Area m2
50
1
100
2
150
3
200
4

Most North End homes will be in the 50 m2 or less category, which means that most containers you will find will be an appropriate size.

We did not find an appropriate box to use, so we built our own. We chose cedar wood because it is naturally weather resistant. Another good choice is hemlock. You can use pressure treated wood, as it is much less expensive but consider that it is toxic. We could only find 2” x 6” lumber, which in retrospect is a little too sturdy for this purpose, and resulted in a very heavy box. 1” x 6” lumber would be perfect. You can make your own construction plans, or use basic carpentry books that feature outdoor/garden projects to find a plan.

Step three: Obtain the materials for making the box drain properly. If you’re using a wheel barrow, all you need is a drill to cut holes at the lowest point in the slope. Otherwise, you’ll need two drainage pipes: one for the bottom of the box, and one for overflow. We used a 3” ABS and a 1.5” ABS pipe for the bottom and overflow respectively. You can find these in the plumbing section of home and construction stores.

To connect them, we used an ABS Tee-Wye like this one. We capped the end of the 3” pipe inside the box so that it would not clog with gravel and soil. For the ends that are outside the box (the top of the overflow pipe and the bottom drain pipe), we used window screen held on with a hose clamp like this one. This ensures small animals cannot get inside the pipe. For the bottom drain pipe, it is easiest if you can find one with pre-drilled holes. This is usually made of PVC. We couldn’t use this because the store didn’t have the other pieces that would make it all fit together. Because of this, we had to drill our own holes. If you drill your own holes, make sure they are at least a centimeter in diameter. We made several rows of holes about 2 cm apart, staggered, on the top half of the pipe.

Step four: Cut a hole in the box for the pipe.
Use the end of the pipe to trace the hole. We used a jig saw to cut out the hole. You can borrow tools like this from the newly opened Halifax Tool Library!

Using a jig saw to cut a hole for the drain pipe.
Checking that the drain pipe fits through the hole.
Step five: Cut the drain pipes to the proper length. The bottom drain pipe should be along the full length of the bottom, and be able to fit into the Tee-Wye piece, which will have another short piece (about 7”) of 3” pipe stick out of the hole in the box. Mark the length, and cut with a small saw like a hack saw, or hand saw. It’s a good idea to cut into a container so you can easily clean up the shavings. We just happened to have a kids’ wheelbarrow on hand for this purpose!

Cutting the drain pipe to the correct length.

Step six: Waterproof your box. We were lucky to find a durable plastic liner without any holes in the hardware store’s waste pile, so we decided to use that. You can also use sheets of PVC liner taped together, or you can also use a PVC pond liner. We placed it in the box, and then cut a small X next to the hole for the small drain pipe. To seal the liner to the drain pipe, we shoved the small piece of the drain pipe into the Tee Wye connector in a way that put the liner flaps from the X cut inside the Tee Wye connecter at the edge of the box next to the hole.

Placing the waterproof liner in the box.

Step seven: Move the box to its final location. It should be at least 30 cm away from the house foundation, and in a location where you can connect a downspout to the box easily.Make sure it is level and stable. We needed to do a bit of leveling of the resting area. To do this, we used a shovel, bricks, and a level to get the box set, and once it was, it would not budge.

Step eight: Prepare for proper drainage. Without proper drainage, the water will remain in the box and stagnate, which can kill the roots of the plants. To help angle the drain pipe, we placed a small brick at the up-slope end to ensure that the pipe was angled down slightly. To avoid the pipe filling with the gravel which goes at the base of the box, we stapled the rest of the window screen material around the drain pipe. Then we filled the first 15 cm of the box with washed gravel in such a way that supported the slight angle of the drainpipe. We shaped the gravel to slope down toward the pipe in the middle, and then placed a piece of landscape fabric over the layer of gravel and pipe. The landscape fabric serves several functions. It helps keep sand and soil from the top layers from clogging the gravel and drain pipe, and because it is semi permeable, it helps to direct water flow into the pipe. We cut small holes in the fabric over the holes in the drain pipe to help water drain into the pipe. Note that all of these elements are parts of the experiment. If you decide to take on building a stormwater planter box of your own, you can decide what elements make sense to you, observe how they work, and let us know what you find!

Drain pipe ready for draining with brick for the angle, and window screen to keep the gravel out of the drain holes.
Gravel fill around the drain pipe, and the overflow pipe with its window screen cap.

Step nine: Fill the box.
Once the basis for good drainage has been set up, it’s time to continue filling the box. With the advice of several avid gardeners, we chose to mix a coarse sand and commerical potting mix together. There was a higher sand ratio at the bottom of the box and lower at the top where the plants will sit. If you want to do tests of drainage for different ratios, you can take a couple of unneeded buckets, cut holes in the bottom, and fill them with different mixes. Then put an equal amount of water, but enough to saturate them, into each bucket and observe how quickly they each drain. Soils in a container are too fine and dense to provide adequate drainage, so potting mix is recommended. To provide some nutrients and improved absorption, we added a layer of natural bark mulch on top.

Step ten: Planting!
This too will be an experiment. We chose to use the very hardy and durable Sedum spectible, which are very popular around Halifax. We felt this was a good plant to use as a test run to observe and learn more about the planting conditions in the box through the seasons. If they perform well, then we will try other plants as well. The plants in the container need to be cold tolerant to last through the winter in a box that’s less insulated than the ground, and to tolerate a variable amount of water. You do not need very many plants to fill a small planter box- maybe 5-6 plants.

Step eleven: Disconnect the downspout and redirect it into the planter box.
You can use a hacksaw to cut the downspout. To make the downspout reach the box, you can use an accordion downspout extension tube like this one.

The finished box!


Tuesday 9 September 2014

Rain Gardens: A Complement to any Veggie Garden

There’s a new rain garden in town, made possible by the RBC Community Action program, and it’s making a small but thriving community garden more beautiful and functional. The 21 Plateau Crescent Killam Properties building in Clayton Park has been growing greener and greener this year. It has eight new raised beds for vegetable growing as of this spring. In just a few months, this little space on the side of the building has become quite the hive of activity. As you’ll notice from the image of this space below, the garden area is on a steep slope. This causes water to flow down next to the building and has caused flooding in the past. Sounds like the area needs another type of garden: a rain garden.
The garden site.

Rain gardens are designed to intercept and absorb stormwater. They can be designed with all kinds of gardening goals in mind. In this case, we chose plants that would enhance the functioning of the community garden, such as plants that attract pollinators, and edible shrubs. Note: If you are thinking about putting edible plants in your rain garden, make sure that the stormwater flowing into the rain garden comes from a roof and not from a paved surface, which will likely have pollutants such as heavy metals and oils. These will settle into the garden soil and will be taken up by your plants. Annual vegetables are never a good rain garden choice anyway because you have to disturb the soil to replant each year. In this case, water flows over the grassy slope into the rain garden, rather than from a paved area, so it is okay to put fruiting shrubs in the garden.

Edible shrubs: Wild raisin, gooseberry, low-bush blueberry and high bush cranberry.

Choosing the location of the rain garden was a little bit tricky. Most of the space is either needed for accessing the garden beds, has tree roots too close, has bedrock too close to the surface, or is too close to the foundation of the building. In order to visualize where people would need to walk, we spread mulch to form paths from the gate to the garden area, and then around each bed. This helped to show what space was left for a rain garden.

Defining paths with mulch helps determine where a rain garden can be.

The next consideration to plan for was the steep slope of the site. A rain garden needs to be level for it to hold water long enough for it to absorb into the ground over several hours. We were able to create a level space while digging, but it does require more work than a less steep location.

Digging and leveling the garden bed. Note the berm made of sod.

To begin however, it is important to mark out the shape of the rain garden so that everyone involved can visualize what shape it will be and where to dig. You can do this with turf spray paint, stakes and line, or simply by cutting in with a shovel, which you can see below. The next step is to remove the sod. It can be used to build up the berm as you can see above. Then you can shift the soil in the middle to level out the planting surface. Check your work periodically with a level to make sure. While digging, also consider whether you have dug deep enough to plant your plants to a proper depth, and whether the garden has a slight depression to catch water flowing across it.


Defining the edge of the garden by cutting sod with a shovel.
Composted sheep manure as a soil amendment.

Once you have loosened enough soil to be able to plant to the proper depth  consider adding soil amendments. We added composted sheep manure. Then mix it around thoroughly so that it is evenly blended in. Then it's time to shape the bed to have a slight depression in the middle to catch water. Once those steps are complete, it's time to plant. For many, that's the fun part!

If you do not have a pre-drawn planting plan, you can do your designing on the spot with your plants. If you are new to gardening and thinking about plant arrangements, this is the easiest way to do it. You can actually see what it will look like, and you can just move the plants around until you are happy with the configuration.

Consider that the middle of the garden will be wetter than the edges, so place plants that require more moisture in the centre of the garden and drier plants on the edges. Space the plants with their future full size in mind to avoid having to move them later. Also think about how people might use the space around the garden. For example, we put the blueberries and gooseberries on the edge near the path so that people can eat berries without needing to walk into the middle of the garden, and the pollinator friendly plants away from the path to help keep bees away from people. You can see the arrangement before planting below.

Arranging the plants before planting.
The final garden is below. Notice how the garden is mostly level despite being on quite a slope. We also put finishing touches on the garden site by planting pollinatoring friendly, dry tolerant flowers such as Black Eyed Susan, Purple Cone Flower and New England Aster along the fence line. These native perennials will help bring bees and other pollinators to the site where they will help to pollinate the vegetables, aerate the compacted soil to make it more absorbent and make the fence line look more welcoming.

The finished garden. It is level compared to the rest of the slope to hold rain.
Planting perennials along the fence.
Many thanks to those who made the project possible:  Killam Properties staff, the many community gardeners and volunteers who came out to help, ISIS staff and volunteers, the Clean Foundation staff and the RBC Community Action Program.


Friday 5 September 2014

Rain Garden: Build Your Own in 3 hours!

Rain gardens are the poster child for an emerging trend in stormwater management called low-impact development or LID. LID stands in contrast to conventional stormwater management approaches which focus on collecting and moving water away from properties via drains, pipes, and treatment facilities. The diagram below, from the University of Maryland’s Integration and Application Network, shows a conventional stormwater situation on the left, and a low-impact develop situation on the right.


Essentially, applying LID means thinking creatively about where to allow water to absorb in the city or town. In a natural area, such as a forest, there are so many places for water to go. If you’ve ever felt rain fall from the leaves of a tree long after the rain has stopped, you can begin to imagine how much water a forest can hold. In a city though, we have to recreate places where water can hang out, and slowly evaporate or seep into the ground to form our groundwater. And we need to recreate these places everywhere we can. The water quality of our lakes, rivers and harbours will improve and our groundwater quantity will increase only when LID is everywhere. Every property owner needs to think about recreating these pockets for water to go.

This is where rain gardens come in. They’re the most beautiful, simple, and fun of the low-impact development options (which also include porous paving, more trees, green roofs, swales, rain barrels, and infiltration trenches). Essentially just a bowl-shaped garden with amended soil to improve drainage, they can be easily and quickly built and planted with a wide variety of gardening goals. And a small rain garden designed for receiving the water of one downspout of a home takes only a few hours from start to finish!

This past June, a group of Ecology Action Centre and RBC volunteers and members of the Bloomfield Neighbourhood Residents Association demonstrated just that on Bloomfield St in the North End of Halifax. Many homes in the North End do not have front yards, and may only have a grassy spot to work with in the sidewalk median. While officially city owned land, many people garden there. We thought it was just begging for a rain garden!
The before shot.

There’s a small house just across the sidewalk with a downspout that needs disconnecting. When disconnected, the water will flow across the sidewalk and into the grass. A rain garden will help ensure that the water can be absorbed into the ground, rather than continue its path into the street and storm drain. It is important to consider where the water actually flows, so you can do a test with a hose if you do not want to wait for rain to observe the flow direction. Make sure to calculate the appropriate size by working through this information here.

Once you’ve done the site assessment and sizing work, you can begin digging! Our first step was to remove the sod. You can either dig it up on the day of your rain garden build, or you can kill the grass by smothering it with cardboard over a period of a few weeks. As you can see below, we dug it up by hand. This took us about an hour. We used a sod-cutting edger and several digging shovels, and moved the sod to a compost bin with a wheelbarrow. If you have an uneven site and you need to make a berm, sod is great for building the berm.
Removing the sod.
The garden space with the sod removed.


Garden Bed Preparation
Once the sod is removed, the next step is to dig the garden down so that there is a slight depression in the middle. This is where rain will slow down and settle, to be absorbed into the ground over the next 24 hours. You will also want to think about breaking up the likely compacted soil with a garden fork or rototiller if you have one. This will form more air pockets in the soil to hold water. If your soil is very clayey, then you’ll want to add soil amendments to open up space for water, such as sand and compost.

To determine how deeply to loosen and amend the soil, look at the depth of the plants you have chosen to plant. You’ll want to be able to dig a hole the accommodate the plant’s roots and still be in nice soil. This will probably mean loosening the soil to a depth of 6-8”. Make sure to mix whatever amendments you add thoroughly to this loosened layer of soil.

Planting
Now you are ready to plant. For a small garden, it is not necessary to draw a planting plan. However, it is still important to choose your plants carefully based on the amount of light your garden location recieves, for the climatic zone you live in, and the unique wet-dry conditions of a rain garden. Beyond that, you can choose the plants you want, considering things like blooming time, colour, size, texture and function. You’ll want to decide whether you want the garden to look full right away, in which case you will need more plants, or whether you are happy to wait for the plants to grow and clump to achieve a full look in a year or two.

Next, take your plants, and set them out in their pots, and play with potential patterns before you plant them. Keep in mind each plant’s moisture needs. Plants that can tolerate very wet soil should go in the middle, and plants that need to be kept drier should go on the perimeter. Once you settle on a placement you like, go ahead and dig the holes, one at a time, to fit each plant. Make sure that the base of the plant, where the top meets the root, is just level with the rest of the soil. It’s a good idea to add a mix of nutrients for the plants, such as a mixture of bone meal,  and sea weed to help the plants through transplant shock. It’s also important to water the plants in well, and to water them once a week until they are established. Spread mulch over the garden to hold in moisture, provide another layer of aborptive material, and reduce the weeding you’ll have to do over time.
Rain garden right after completion.

We were able to have most of the plants in the garden donated from nearby gardens. Therefore, not all the plants are native or are a particularly good fit for the wet-dry cycle of a rain garden. If you do end up with plants like this, you can simply place them near the edges of the garden, where the garden will have less moisture. We did this with the donated geraniums, for example. By using donated plants, we spent less than $70 on this small rain garden. So with a few people working for just 2.5 hours and spending very little money, it’s possible to create a rain garden that’s great for water, and great for making your street more beautiful.


Rain garden in late summer with new mulch and a few new plants.


Tuesday 15 April 2014

Halifax Water Stormwater Fee

There has been much attention paid to the recent stormwater fee that is being charged to residents and businesses in serviced and unserviced areas of HRM[1].  Service in this case refers to water and wastewater services.  Residents in unserviced areas of HRM who would not otherwise be receiving a water bill are particularly upset. At first glance, this is understandable, as their drinking water comes from a well and their wastewater is managed onsite with a septic system.

However even properties in unserviced areas of HRM generate stormwater runoff.  Stormwater is the rain or snowmelt that flows off a roof, driveway, parking lot, paved walkway or any other hard surface on a property.  Outside of peninsular Halifax, stormwater runoff ends up in nearby streams, rivers and lakes without prior treatment.  Since stormwater comes into contact with litter, gasoline, oils, brake pad dust from our cars, pesticides, waste from our pets and many other toxins along its journey, stormwater is a significant source of pollution to our water ways.

There is no question that Halifax Water needs to improve the way it manages stormwater in HRM.  We cannot continue to treat our lakes and rivers as a wastewater facility.  Many of our urban lakes such as Lake Banook, Lake Echo and Oathill Lake have reached, or are quickly reaching, their carrying capacity.  Our enjoyment of these water bodies for fishing, swimming, boating and aesthetic value is being compromised. 

Halifax is not unique in charging a stormwater fee.  Other Canadian cities like Victoria, Edmonton, Kitchener, Mississauga and many others have recognized the need to charge a fee for stormwater management.  The principle that HRM and numerous other cities have recognized is simple: if you receive a service you should pay for it.

The Ecology Action Centre conditionally supports the stormwater fee being collected by Halifax Water in order to address inadequacies in our current stormwater management system.  The conditions are:
  • The stormwater fee is used to maintain and improve stormwater infrastructure, especially where it has been neglected or under-maintained.
  •  Halifax Water starts using low impact development (LID) approaches, such as rain gardens, bioswales and constructed wetlands for managing stormwater (others discussed on this blog) .  LID approaches are more cost effective and achieve better environmental outcomes than conventional approaches, and
  • Residential, commercial and institutional customers can receive a fee assessment and rebate if they use stormwater management techniques that infiltrate 100% of runoff on site and do not contribute any additional stormwater to the system.  Financial incentive systems such as the ones implemented in Waterloo and Kitchener, ON are excellent examples.
Rain garden built on Dahousie campus, summer 2013
We need to do better than piping and ditching for stormwater conveyance.  We need to implement innovative stormwater options that act as treatment systems, recharge groundwater and provide habitat for birds, pollinators and other urban wildlife.

Adopting LID approaches would lead to many direct environmental benefits such as improved flood control, increased fish populations, water quality that meets recreational swimming standards, and enhancement of future drinking water supplies through increased groundwater recharge.

The Ecology Action Centre is organizing an educational and hands-on workshop series to help property owners understand the breadth of LID options for managing stormwater on-site.  The first workshop is a walking tour of a rain garden and other stormwater options on Thursday April 24th at 6 PM.  Please click here for more information. 

Tuesday 1 April 2014

New Video Series: Innovations in Stormwater Management

A new new video series entitled Innovations in Stormwater Management, was recently produced by Dr. Hans Schreier and the Master of Land and Water Systems program at the University of British Columbia.

The series is made up of 4 short videos that explore innovative stormwater management at the property, neighborhood and watershed scale.  A fourth video provides an introduction and overview of the key concepts.

“The video series is designed to show what individual house owners can do to manage rainfall, reduce their water footprint and minimize surface runoff from their property. At the neighborhood scale, we feature municipal innovations that deal with roads and parking lot runoff; and at the watershed scale, we address the cumulative effects and the options to reduce all impacts from urban activities," explains Julie Wilson, Academic Coordinator, Master of Land and Water Systems Program at the University of BC. Julie Wilson is the narrator and producer of the video series.

Video Team: Julie Wilson, Duncan McHugh and Hans Schreier, Faculty of Land & Food System, U.B.C.

"It was a pleasure to showcase some of the local champions of low impact designs for urban rainwater and stormwater management in this video series,” states Dr. Hans Schreier, Emeritus Professor, Faculty of Land and Food Systems at the University of British Columbia. “Our interactive map shows all of our featured locations, and this is just a drop in the bucket in terms of what is out there!”

“Given the increase in climatic variability and urban land use intensification, it is high time that we promote innovations that deal with increasing flooding events and urban pollution. The video series features what some of the leaders in innovative stormwater management are doing in the Metro Vancouver region.”

“This is our first attempt in trying to translate science into actions in the hope that these innovations will be increasingly mainstream in the future,” concludes Hans Schreier.

Click here to access the video series (http://mlws.landfood.ubc.ca/videos/)

Thursday 20 February 2014

Rain Garden Workshop Follow Up- Resources

Whether you were able to attend the Rain Garden Planning Workshop this past Tuesday evening or not, we think you'll find the resources we discussed very useful if you do decide to plan and build a rain garden in 2014.

Call Before You Dig
We talked about the importance of locating buried infrastructure such as gas and water lines. This is often called "Call Before You Dig." Here in Halifax, you'll need the following information:

Heritage Gas: 1-866-313-3030
Halifax Water: http://www.halifax.ca/hrwc/CallBeforeYouDig.html Go here to download, fill out and submit the Locates Request Form. Only call to follow up once the form has been submitted.
Bell Aliant: 1-800-332-3333

Rain Garden Guides
Once you're sure you are not going to hit anything important while digging, you can get on to siting and planning your garden. We talked about siting considerations, determining the rain catchment area, soil type, slope and sizing of rain gardens. There are many great rain garden handbooks and manuals freely available online. A good one should discuss all of these factors in detail. The ones below are thorough and clear with great diagrams. 

The Vermont Rain Garden Manual “Gardening to Absorb the Storm” http://www.uvm.edu/seagrant/sites/uvm.edu.seagrant/files/vtraingardenmanual.pdf
Rain Garden Layouts from Maine http://www.maine.gov/dep/land/stormwater/stormwaterbmps/vol1/appendixa.pdf from Maine Stormwater Best Management Practices Manual found here http://www.maine.gov/dep/land/stormwater/stormwaterbmps/
The New Jersey Rain Garden Manual

Evergreen Native Plant Database
Many of the plants listed in them will be relevant, but we recommend using the Evergreen Native Plant Database Advanced Search function to determine whether a plant is native to Nova Scotia. You can also use it to sort other plant characteristics like colour, sun and soil preferences, and uses such as wildlife habitat creation or property shading. 

Useful Books Available at the Halifax Public Libraries
Best Garden Plants for Atlantic Canada by Duncan Kelbough and Alison Beck http://discover.halifaxpubliclibraries.ca/?itemid=|library/m/halifax-horizon|1558998

Creating Rain Gardens by Cleo Woelfle-Erskine and Apryl Uncapher http://discover.halifaxpubliclibraries.ca/?itemid=|library/m/halifax-horizon|1766234